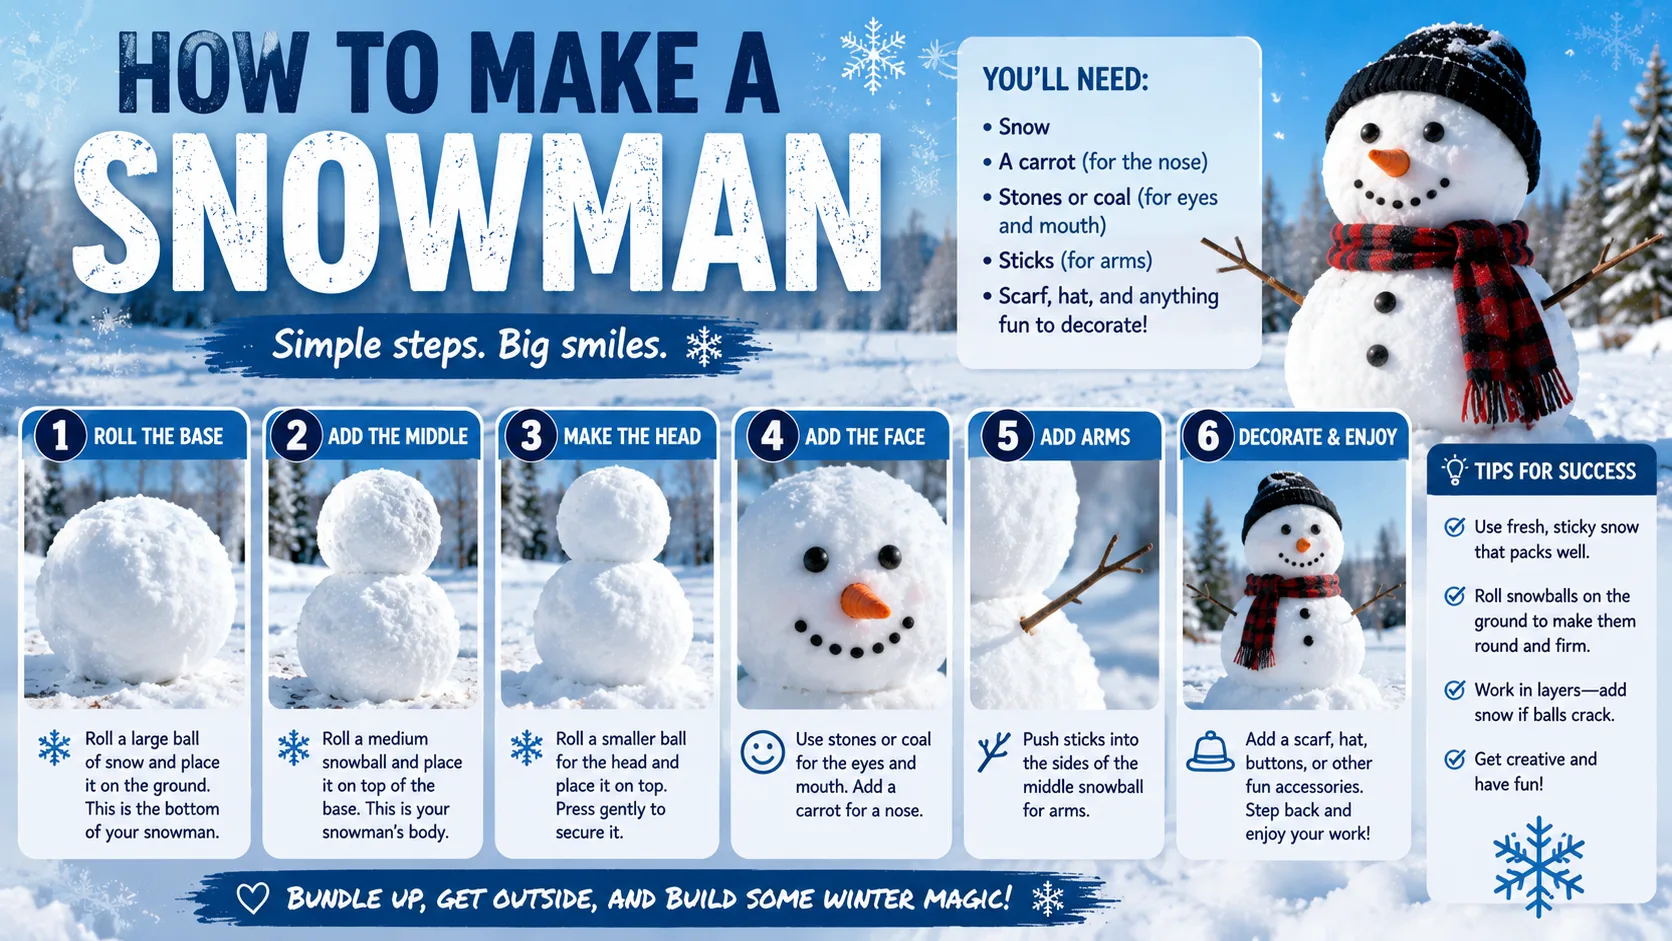
To make a snowman, you need packing snow, three snowballs of decreasing size stacked on top of each other, and simple decorations like a carrot nose, stick arms, and coal or button eyes. The whole process takes most families 30 to 45 minutes once you have the right kind of snow.
This guide walks through exactly how to check if your snow is packable, build a snowman that will not collapse by lunchtime, and decorate it properly, plus how to tell if today is even a good snowman day using a snow day calculator to check local conditions first.
What Makes a Good Snowman
A good snowman starts with the right snow, not the right technique. Packing snow, meaning snow that is moist enough to stick together when squeezed but not so wet that it turns to slush, is the single biggest factor in whether your snowman holds its shape.
Beyond the snow itself, a good snowman needs three things:
- A wide, stable base that can support the weight of the sections above it
- Proportional sections so the middle and head do not overwhelm the base
- Packed, not loose, snow at every stage, since gaps and air pockets are what cause a snowman to collapse or lean
Once those three things are in place, the decorating step is really just personal style. There is no wrong way to give your snowman a face, as long as the structure underneath is solid.
Location matters too, more than most people think about in advance. A flat, open area of undisturbed snow gives you the most material to roll with. Building near trees or fences can be convenient for leaning tools or props against later, but disturbed, trampled snow underneath a tree is often harder to roll into a smooth ball than snow out in the open yard.
Time of day plays a role as well. Snow tends to be most packable in the mid-morning to early afternoon, after the coldest overnight temperatures have passed but before any daytime melting has made it too wet. Building right after a fresh overnight snowfall, once the sun has been up for an hour or two, is often the sweet spot.
[Suggested image placement: A finished classic three-tier snowman in a snow-covered yard with a carrot nose and stick arms. Alt text: "How to make a snowman with carrot nose and stick arms in the snow."]
Why Some Snow Packs and Some Does Not
Not all snow is created equal when it comes to building. The moisture content of snow determines whether it holds together or falls apart the moment you try to shape it.
Snow generally falls into three categories that matter for snowman building:
- Dry powder: Common in very cold temperatures, this snow is light and fluffy but will not stick together no matter how hard you pack it
- Packing snow: Usually forms when temperatures hover right around freezing, this snow has just enough moisture to compress and hold its shape
- Wet, heavy snow: Forms in warmer, wetter conditions and packs easily but can be extremely heavy to lift and may collapse under its own weight
Temperature is the fastest way to predict which type you are dealing with. Snow falling right around 32 degrees Fahrenheit tends to be the most packable, while snow falling in single-digit or below-zero temperatures is almost always too dry to build with.
Checking conditions before heading outside saves a lot of frustration. If you are unsure whether today's storm will even bring packable snow, reviewing the forecast on the state-by-state predictions page can give you a sense of expected temperatures alongside snowfall totals.
The Quick Squeeze Test
You do not need a thermometer to know if today's snow will work. Scoop up a handful and squeeze it firmly in your fist for a few seconds, then open your hand.
- If it holds a solid ball shape with minimal crumbling, it is good packing snow and ready to build with
- If it falls apart or crumbles back into loose flakes, it is too dry and will not hold together no matter how hard you pack it
- If it drips water or feels slushy in your hand, it is on the wetter end, still buildable but expect heavier sections
This thirty-second test saves a lot of wasted effort compared to rolling a ball for several minutes only to watch it crumble apart.
The 3-2-1 Size Ratio
Most sturdy, classic snowmen follow a simple proportion for the three sections. This ratio keeps the structure balanced so the head does not topple the middle section, and the middle does not overwhelm the base.
| Section | Approximate Width | Purpose |
|---|---|---|
| Base | About 3 feet wide | Provides a stable, wide foundation for the whole structure |
| Middle | About 2 feet wide | Adds height while staying light enough to lift onto the base |
| Head | About 1 foot wide | Small and light enough to shape and lift by hand |
You do not need a tape measure to follow this ratio. As a simple rule, each section should look noticeably smaller than the one below it, roughly by a third each time.
This ratio exists for a practical reason, not just tradition. A base that is too small relative to the middle section cannot support the weight above it, which is the most common reason snowmen tip over shortly after being finished. Keeping the base clearly the widest section is the single easiest way to avoid that problem entirely.
Step-by-Step: Building Your Snowman
Once you have confirmed the snow is packable, gather a few basics before you start: waterproof gloves, a carrot or other nose object, dark items for the eyes and mouth, and two sturdy sticks for arms. Having everything ready means you will not need to leave a half-finished snowman to go searching for decorations.
Follow these steps for a sturdy, classic snowman:
- Start a small snowball by hand. Pack a tight, fist-sized ball of snow to use as your starting core.
- Roll it across the ground to build the base. Roll in different directions rather than a straight line so the ball grows evenly into a round shape. Stop when it reaches roughly 3 feet wide or becomes too heavy to roll further.
- Build the middle section the same way. Start a new snowball and roll it until it reaches about 2 feet wide, noticeably smaller than the base.
- Lift the middle section onto the base. Center it carefully so the snowman stands straight, and pack extra snow around the seam to help the two sections bond together.
- Shape the head separately. Roll or hand-pack a smaller snowball, about 1 foot wide, then lift it onto the middle section and center it.
- Pack the seams between all three sections. Use handfuls of snow to smooth and reinforce each joint, which is what keeps the head and middle section from sliding or falling off later in the day.
- Add your decorations. Insert a carrot nose, stick arms, and coal or button eyes once the structure feels solid.
Decorating Ideas and Uses
Decorating is where a snowman becomes personal. Classic options include a carrot for the nose, coal or dark buttons for the eyes and mouth, and sticks for the arms.
Beyond the classic look, families often add:
- A hat and scarf for extra personality and warmth-themed styling
- Buttons down the middle section to mimic a coat or vest
- Small stones or dark candy as an alternative to coal for the face
- A small shovel or broom prop leaned against the base for a classic winter scene
Snowman building also works well as a structured winter activity for kids, since it combines physical activity with a creative, open-ended finish. It pairs naturally with other outdoor winter traditions like sledding or a short nature walk once the building is done.
If your yard does not have natural materials like sticks or stones nearby, a small bag of craft supplies works just as well. Felt scraps, pom-poms, and a spare scarf or mittens from the closet can all be repurposed for a season and then stored away for next year.
Troubleshooting a Leaning or Collapsing Snowman
Even with good technique, snowmen sometimes lean or lose a section partway through the day. A few quick fixes handle most common problems:
- Leaning head or middle section: Pack additional snow into the seam on the side opposite the lean to help straighten it back out
- Sinking base in warm weather: This is usually unavoidable as temperatures rise during the day, but building in a shaded spot can slow the melt significantly
- Arms falling out: Push sticks in at a slight downward angle rather than straight in, which helps them grip the packed snow instead of sliding back out
- Face features falling off: Press decorations firmly into the snow rather than just resting them on the surface, giving the snow a chance to freeze around the edges
Real-World Examples
Example 1: A family checks the forecast and sees temperatures sitting right around 33 degrees Fahrenheit with fresh snowfall overnight, ideal packing conditions. They build a full 3-2-1 ratio snowman in about 35 minutes.
Example 2: A parent tries to build a snowman during a deep cold snap with temperatures near 10 degrees Fahrenheit. The snow will not hold together no matter how hard it is packed, so the family switches to building smaller snow sculptures with wet snow scraped from a shaded, slightly warmer spot instead.
Example 3: A group of kids builds a smaller, one-section snowman using the 1-foot head-sized ball as a standalone mini snowman, a good option when snow is limited or the yard is small.
Example 4: A neighborhood group of families decides to build several snowmen along a shared sidewalk after a weekend storm. They split roles by section, with some rolling bases, others building middle sections, and kids handling the smaller heads and decorations, finishing five snowmen in under two hours working together.
"Always roll the snowball in different directions to keep it round, and pack it down periodically so it holds together instead of loosening up as it grows." — summarized from snowman-building guidance published by Lake Mountain Alpine Resort
"Pack snow in between each section so it blends together, which gives the whole structure a sturdier build." — summarized from winter activity guidance published by Great Wolf Lodge
Packing Snow vs. Powder vs. Wet Snow
| Snow Type | Best For Building? | Typical Temperature |
|---|---|---|
| Dry powder | No, will not hold shape | Single digits or below freezing by a wide margin |
| Packing snow | Yes, ideal for building | Right around 32 degrees Fahrenheit |
| Wet, heavy snow | Packs easily but very heavy | Above freezing, wetter storms |
A Few Snowman Facts Worth Knowing
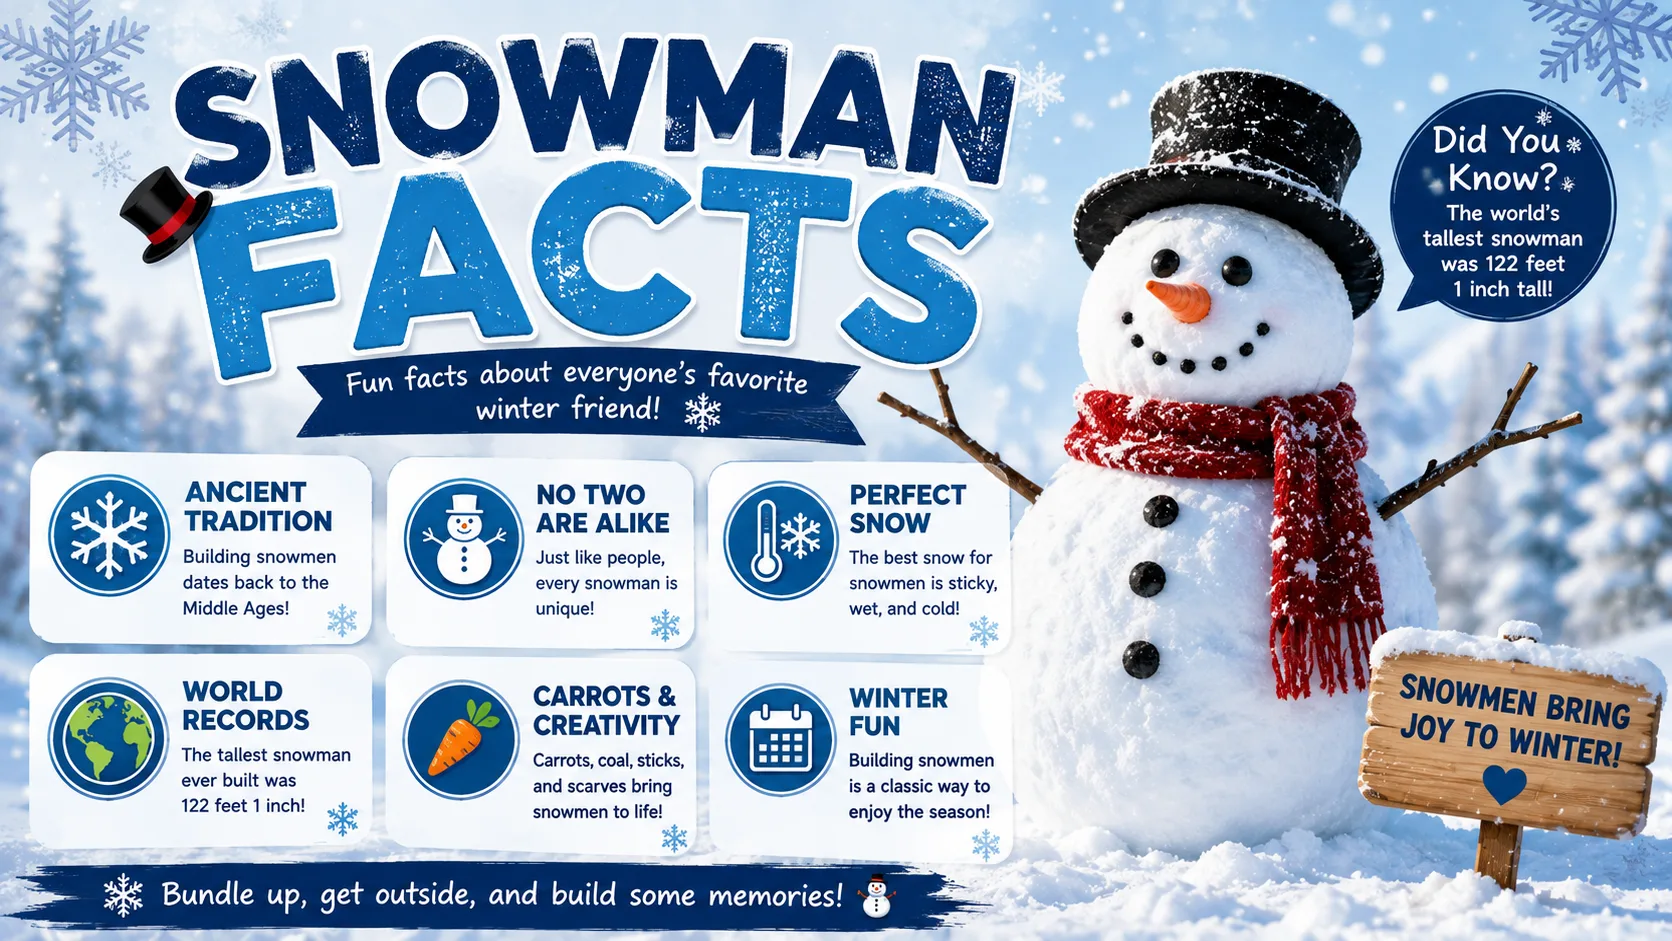
Snowman building has a long, informal history as a winter tradition across many snowy regions, with families passing down favorite techniques and decorating styles for generations. A few fun details add some extra context for the activity:
- The classic three-ball shape is not a strict rule, some regional traditions favor two sections instead of three, especially for smaller snowmen built by younger kids
- Carrots became the standard nose largely because of their availability, shape, and bright color against white snow, though any similarly shaped object works just as well
- Snowmen have appeared in art and media for centuries, often as a symbol of winter itself rather than any specific holiday
- Record-sized snowmen built by communities have reached well over 100 feet tall using heavy equipment, though a family-built version rarely needs to exceed 4 to 5 feet for a satisfying result
None of this trivia changes the technique, but it is a fun way to add context if you are building with kids who enjoy learning a bit about the traditions behind the activities they take part in.
Read More : Snow Day for Teachers
Common Mistakes and Pro Tips
Mistake 1: Rolling the snowball in a straight line. This creates a lumpy, uneven shape. Rolling in different directions across the yard keeps the ball round as it grows.
Mistake 2: Skipping the seam-packing step. Forgetting to pack extra snow between sections is the most common reason a snowman's head falls off within a few hours.
Mistake 3: Building with dry powder. No amount of technique will fix snow that simply will not stick together. Check the temperature first, or wait for it to warm slightly closer to freezing.
Pro tip: If you are not sure whether today's storm will bring packable snow or if school will even be canceled, check the main snow day calculator the night before so you can plan a building session around the best window of weather.
Pro tip: Building against a very cold wind can make the whole process feel much colder than the temperature suggests. Use the wind chill calculator to judge how bundled up kids should be before heading outside for an extended building session.
Mistake 4: Making all three sections the same size. Without a clear size difference between the base, middle, and head, the snowman looks flat and can be harder to stack securely. Aim for a visible step down in size at each level.
Mistake 5: Ignoring where the sun hits your yard. A snowman built in direct afternoon sun will melt and lean noticeably faster than one built in a shaded spot. If you want your snowman to last more than a day or two, shade is worth considering during placement.
Staying Safe and Warm While Building
Building a snowman is low-risk compared to most winter activities, but a few basic precautions make the experience more comfortable, especially for younger kids.
- Wear waterproof gloves or mittens rather than knit gloves, since packing snow by hand soaks through fabric gloves quickly
- Take breaks to warm up every 20 to 30 minutes, especially with young children who may not notice cold hands until they are uncomfortably numb
- Watch for signs of overexertion when rolling large, heavy snowballs, since lifting a wet, heavy middle section can be a genuine strain, particularly for kids
- Check the temperature and wind chill before committing to a long building session outdoors
Conclusion
Making a snowman comes down to two things: finding packable snow and stacking three proportional sections with well-packed seams. Once the structure is solid, decorating is where the fun really starts, and there is no wrong way to give your snowman a face.
A little planning goes a long way too. Checking the squeeze test before you commit to building, following the 3-2-1 ratio for a sturdy shape, and dressing for the actual wind chill rather than just the temperature will save you from the most common frustrations, from a crumbling base to cold, unhappy kids twenty minutes in.